
If you’re looking for a simple yet tasty meal, shrimp piccata is a fantastic choice. This dish is quick to whip up and is packed with flavor. Plus, it’s gluten-free, so it works well for my family.
Solves weeknight dinner stress by delivering quick shrimp piccata in a single pan with tangy caper lemon sauce, minimal ingredients and predictable results.
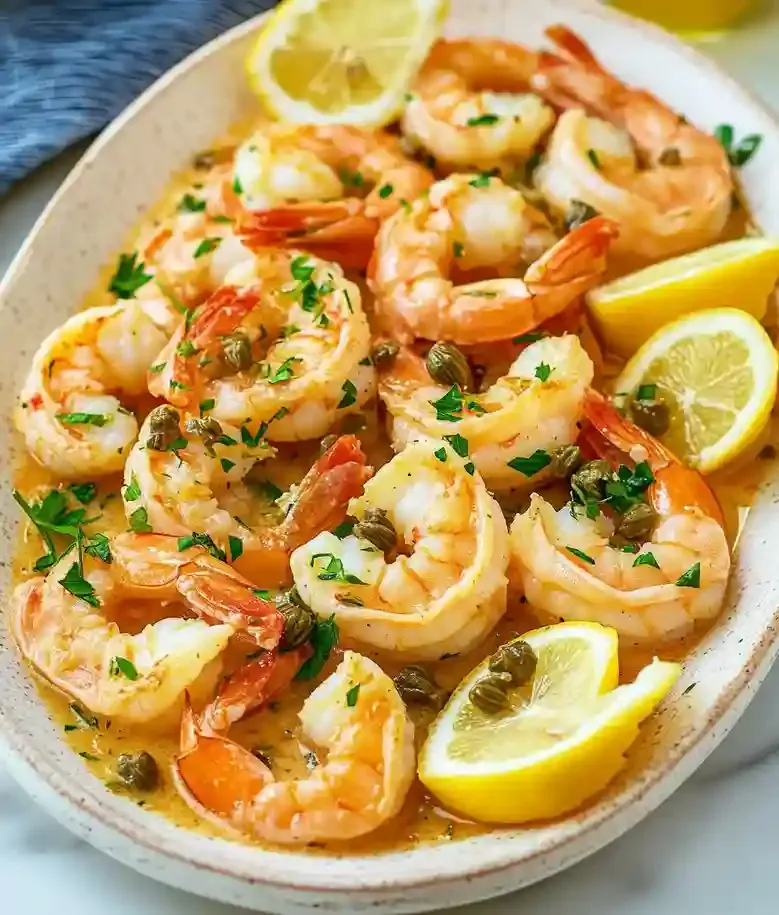
Sometimes, I struggle to find quick seafood recipes that fit my needs. Cooking shrimp can be tricky since they get rubbery really fast. But with this shrimp piccata recipe, you’ll get tender shrimp every time, and it only takes 20 minutes from start to finish.
What makes this dish work so well is its straightforward ingredients that create a bold tangy sauce. The frozen shrimp makes it super convenient, and simmering the sauce helps thicken it just right. You can easily serve this with pasta or a side of veggies.
If you want to try something else with shrimp, I recommend this Shrimp Alfredo. It’s another quick and simple recipe that might become a new favorite in your kitchen!
Why You Will Love This Recipe
- Convenient Cooking This recipe’s a breeze thanks to frozen shrimp, letting you whip up a delicious meal in just 20 minutes without any fuss.
- Bold Flavor The combination of lemon, capers, and butter creates a tangy and savory sauce that elevates the shrimp and enhances every bite.
- Perfect Texture With a technique that prevents overcooking, you’ll enjoy tender, juicy shrimp that complement that thick and luscious sauce beautifully.
- Easy Storage Leftovers can hang out in the fridge for up to two days, making it a simple option for quick meals later on.

Easy Shrimp Piccata Recipe
- Prep Time: 10 minutes
- Cool Time: 0 minutes
- Cook Time: 10 minutes
- Total Time: 20 minutes
- Yield: 4 servings 1x
- Category: main course
- Method: skillet
- Cuisine: Italian
- Diet: gluten-free
Description
A delicious gluten-free dish featuring sautéed shrimp in a flavorful lemon-caper sauce, perfect for a quick meal.
Ingredients
- 1 pound (450g) jumbo shrimp (21 to 30 per pound), peeled and deveined
- Kosher salt, to taste
- Black pepper, to taste
- 3 tablespoons (45g) flour
- 1/4 cup (60ml) extra virgin olive oil, divided
- 2 tablespoons (28g) unsalted butter
- 3 garlic cloves, thinly sliced
- 1/2 cup (120ml) dry white wine or chicken stock or seafood stock
- 1/4 cup (60ml) lemon juice (from 1 to 2 lemons)
- 1/4 cup (45g) capers (3-ounce jar), drained
- 1 tablespoon (15g) minced fresh parsley
- Lemon wedges, to serve
Instructions
- Heat the Pan: Start by heating your skillet over medium-high heat until it is nice and hot. You will know it is ready when it shimmers and a drop of water sizzles on contact. A hot pan is essential for searing the shrimp perfectly, so do not skip this step.
- Sear the Shrimp: Add the shrimp in a single layer and sear for a couple of minutes on each side until they turn pink and opaque. The sizzling sound is music to your ears! Be careful not to overcrowd the pan, as that could lead to steaming instead of browning.
- Add the Flavor: Once the shrimp is cooked, take them out and toss in some garlic and capers. Let that cook for a minute until fragrant. This step boosts the dish with flavor, so do not rush it.
- Deglaze with Lemon: Pour in some broth and lemon juice, scraping up those tasty bits from the bottom of the pan. Let it bubble for a bit, thickening the sauce. Scraping is worth it for the flavor.
- Finish with Shrimp: Return the shrimp to the skillet and let them mingle with the sauce for a minute. This is all about coating the shrimp and making sure they absorb the deliciousness, so do not rush!
- Garnish & Serve: Sprinkle some fresh parsley over the dish right before serving. It adds a pop of color and fresh flavor. Dishing it out while it is still warm is key to keeping that saucy goodness intact, so enjoy it immediately!
Notes
- Store leftovers in an airtight container in the refrigerator for up to 2 days.
- Ensure you adhere to the cooking time of 1.5 to 2 minutes per side for tenderness to avoid overcooking the shrimp.
- If the sauce seems too sour, adjust the lemon juice. Consider adding a touch of honey for sweetness.
- Make sure to pat the shrimp dry and avoid overcrowding the pan while searing for optimum browning.
- Allow the sauce to simmer on low heat for a few extra minutes if it is not thickening as desired.
- When working with frozen shrimp, thaw them overnight in the refrigerator for best results.
- To reheat, place in a skillet over medium heat for 3 to 5 minutes until heated through.
- Serve over spaghetti or angel hair pasta.
- Accompany with garlic bread for dipping into the sauce.
- Pair with a fresh Italian salad to balance the meal.
- Substitute shrimp with scallops for a different taste.
- Add capers and olives for an extra briny flavor.
- Use a blend of freshly chopped herbs like rosemary and thyme for added depth.
- For a non-alcoholic version, substitute white wine with chicken stock or seafood stock.
- Use cornstarch or one-to-one gluten-free flour instead of flour for a gluten-free option.
Nutrition
- Serving Size: 1 serving
- Calories: 304.7
- Sugar: 0.8g
- Sodium: 948.4mg
- Fat: 20.5g
- Saturated Fat: 5.6g
- Unsaturated Fat: 0g
- Trans Fat: 0g
- Carbohydrates: 8.5g
- Fiber: 0.6g
- Protein: 16.6g
- Cholesterol: 157.9mg

Recipe Tips
- If shrimp is overcooked, stick to searing them for 1.5 to 2 minutes per side for tenderness.
- When the sauce seems too sour, a simple adjustment of lemon juice can help; consider adding a touch of honey for sweetness.
- For optimum browning, make sure to pat the shrimp dry and give them enough space in the pan while searing.
- If the sauce isn’t thickening, allow it to simmer on low heat for a few extra minutes to develop that desirable consistency.
- When working with frozen shrimp, be sure to thaw them in the refrigerator overnight for best results.
Serving Suggestions
Serve shrimp piccata over spaghetti or angel hair pasta for a satisfying meal. Add garlic bread for dipping into the flavorful sauce and enjoy.
This dish can also shine in different recipes such as shrimp piccata salad or shrimp piccata tacos. Experiment with serving the shrimp alongside other vegetables or grain alternatives.
Consider adding a drizzle of fresh lemon juice for a bright finishing touch. A sprinkle of parsley can bring freshness and color to the dish.
Recipe variations
- You can swap the shrimp for 1 pound of scallops if you want a different seafood option.
- Add 1 tablespoon of minced fresh rosemary, along with the garlic, for a fragrant twist to the dish.
- Either sprinkle in some olives or add extra capers for that briny burst, depending on your preference.
- If you’re cooking for a larger group, use 2 pounds of shrimp and double the other ingredients accordingly.
Save This Recipe!
How to Store?
To keep your shrimp piccata fresh, follow these storage tips:
Refrigeration: Store leftovers in an airtight container in the refrigerator for up to 2 days.
Freezing: Place shrimp piccata in an airtight freezer bag. Freeze for up to 3 months. Thaw in the refrigerator before reheating.
Reheating: Reheat in a skillet over medium heat with a splash of water to maintain moisture.
Other Recipes You’ll Love
If you enjoyed this shrimp piccata or any other recipe on my blog, please leave a ⭐ star rating and let me know how it went in the comments below. I appreciate taking time to read about this recipe, thank you!