
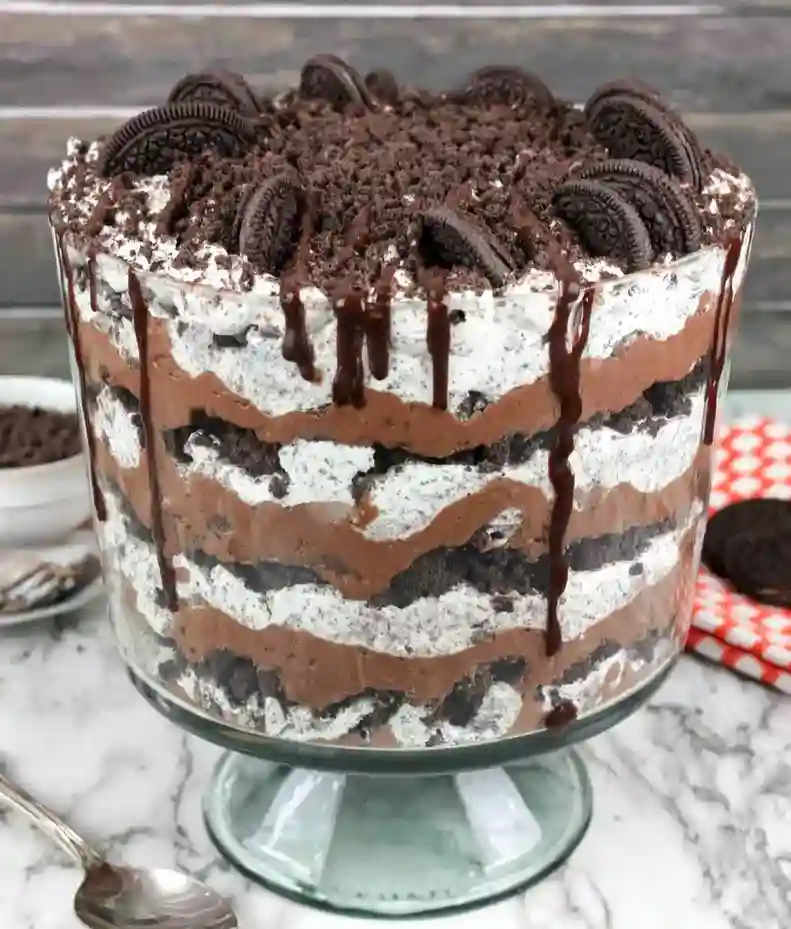
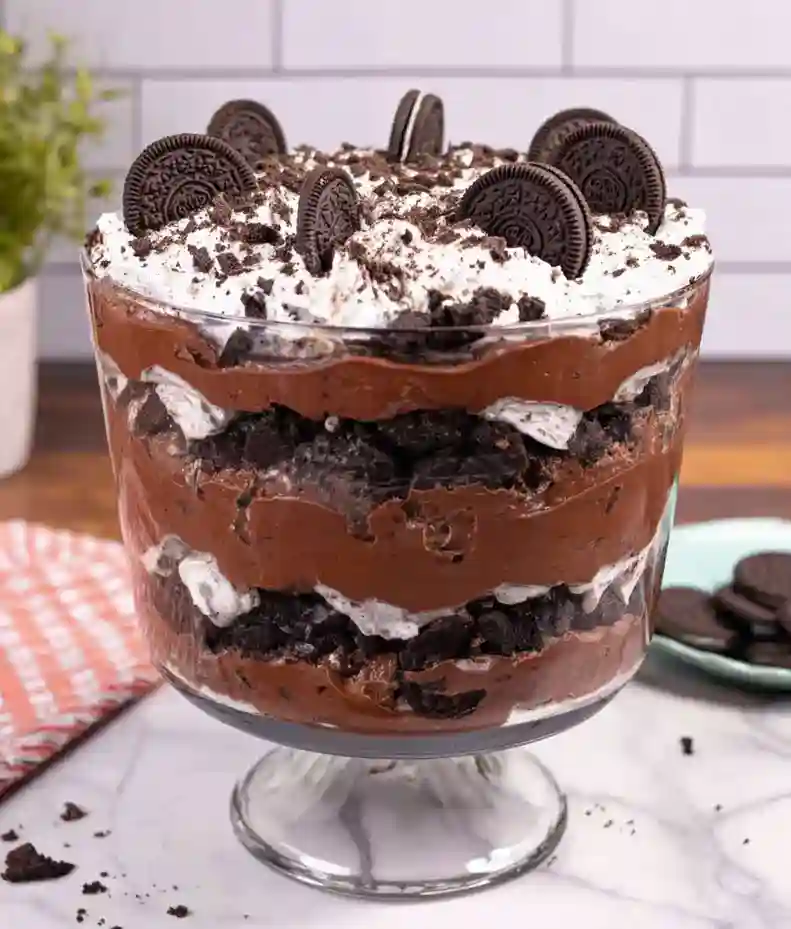
If you’re on the hunt for a sweet and fun dessert, try this delicious Oreo trifle. It’s layered with chocolate cake, creamy pudding, and whipped cream, and trust me, it’s a real treat for the eyes, too!
This easy Oreo trifle solves shopping frenzy, time crunch, and dessert indecision by delivering a quick, layered treat with familiar textures.
I remember when I first tried to make a trifle. I thought it would be a piece of cake, pun intended! But figuring out how to layer everything without it falling apart was a challenge. Thankfully, this recipe has easy steps that prevent that from happening, making it simple even for beginners.
What I love about this Oreo trifle recipe is how quickly it comes together. With just an hour and a half, you’ll have a dessert that looks like you spent hours on it. The moist chocolate cake and rich chocolate pudding come together so well, making each layer something special.
If you love chocolate desserts, then this is for you! If you want another sweet idea, check out my Baked Strawberry Pie for a fruity twist!
Why You Will Love This Recipe
- Rich Chocolate Flavor : The layers of moist chocolate cake and rich chocolate pudding create a dessert that’s so satisfying and sweet. It’s a chocolate lover’s dream come true.
- Creamy Texture : Homemade whipped cream adds a fresh creaminess that blends perfectly with the layers, making each bite delightfully creamy without being overly heavy.
- Convenient Assembly : Using pre-made ingredients like chocolate pudding means you can whip this up with minimal fuss, perfect for when you’re short on time.
- Storage Friendly : You can make this trifle ahead of time and store it in the fridge. Though the whipped cream may lose its shape, the flavor stays fantastic for days.

Easy Oreo Trifle Dessert Recipe
- Prep Time: 30 minutes
- Cool Time: 30 minutes
- Cook Time: 30 minutes
- Total Time: 1 hour 30 minutes
- Yield: 30 servings 1x
- Category: dessert
- Method: no bake
- Cuisine: American
- Diet: vegetarian
Description
This Oreo Trifle recipe features layers of chocolate pudding, crushed Oreos, and whipped cream for a delightful no-bake dessert.
Ingredients
- 1 1/2 cups (180g) all-purpose flour, sifted
- 1 1/3 cups (267g) granulated sugar
- 1/4 cup (25g) unsweetened cocoa powder, sifted
- 3/4 tsp (3.5g) baking powder
- 1 1/2 tsp (7.5g) baking soda
- 1/2 tsp (2.5g) fine salt
- 3/4 cup (180ml) hot water
- 1 1/2 tsp (7.5g) instant espresso or coffee
- 1/2 cup (120ml) buttermilk, room temperature
- 1/3 cup (80ml) vegetable or canola oil
- 1/4 cup (60g) full-fat sour cream, room temperature
- 2 large eggs, room temperature
- 1 tsp (5ml) vanilla extract or vanilla bean paste
- 2 packages (3.9 oz each) instant chocolate pudding
- 4 cups (960ml) whole milk
- 1 cup (8 oz) block full-fat cream cheese, cold
- 1 cup (120g) powdered sugar
- 1 tsp (5ml) vanilla extract or vanilla bean paste
- 2 cups (480ml) heavy whipping cream, cold
- 2/3 cup (60g) crushed Oreos
- 3 cups (270g) chopped Oreos
- 14 whole Oreos for garnish
Instructions
- Layer The Oreos: Start by crushing the Oreos into fine crumbs. The texture should feel like sand between your fingers. This is crucial because it adds a nice crunch to the trifle while soaking up the delicious flavors. Avoid big chunks, as they won’t blend well with the other layers.
- Prepare The Pudding Mix: Next, whip up the pudding according to the package instructions. You’ll know it’s ready when it thickens and looks smooth. This pudding layer is key for creaminess in each bite. If you hesitate while mixing, it might not set correctly, leaving the layers runny.
- Whip The Cream: Now, whip the cream until stiff peaks form. This will give your trifle a light and airy texture. The cream should hold its shape and not drip when you lift the whisk. Over-whipping can lead to a buttery mess, so stop right when it’s perfect.
- Assemble The Layers: Layer the crushed Oreos, pudding, and whipped cream in a serving dish randomly. As you build, let the layers mound up beautifully for a visual treat. This layering creates a charming look and keeps each forkful exciting. Avoid skipping layers; it’ll ruin the texture.
- Chill Before Serving: Pop the trifle in the fridge to chill for at least an hour. You’ll notice it’ll set more and develop richer flavors. This step is vital because it lets all that deliciousness mingle. Don’t rush it; serving too soon might lead to a mushy trifle.
Notes
- Storage Tips: Make the trifle in advance and tightly wrap with plastic wrap to keep fresh. Leftovers can be stored in the fridge for up to 3 days, but the whipped cream will lose its shape after that.
- Expert Tips: If the whipped cream is too soft, whip it until stiff peaks form before mixing it with other ingredients. When cutting the cake, aim for uniform squares around 2 inches to maintain even layers during assembly. If the pudding is not setting, review your measurements to ensure the correct ratio of pudding mix to milk. For a better texture, add pudding before it is completely set, which helps it absorb into the cake layers. When making whipped cream, consider doing it from scratch for a fresher taste compared to store-bought options.
- Reheating Instructions: Not applicable as this is a no-bake dessert.
- Serving Suggestions: Serve with fresh berries on the side, top with additional crushed Oreos for crunch, or pair with a scoop of vanilla ice cream.
- Recipe Variations: Replace chocolate pudding with vanilla for a different flavor. Use store-bought cake for a quicker option. Incorporate layers of fruit like strawberries or bananas.
- Ingredient Notes: The recipe turns out best with all-purpose flour. For buttermilk, alternatives include full-fat yogurt, additional sour cream, whole milk, or alternative yogurt or milk for different dietary needs. You can substitute sour cream with full-fat yogurt or additional buttermilk. For the instant espresso or coffee, you can omit this ingredient. Use vegetable oil or any flavorless oil like canola or sunflower oil. For vegan whipped cream, consider substituting heavy cream with coconut cream.
Nutrition
- Serving Size: 1 serving
- Calories: 336
- Sugar: 28g
- Sodium: 277mg
- Fat: 17g
- Saturated Fat: 7g
- Unsaturated Fat: TBD
- Trans Fat: 0g
- Carbohydrates: 43g
- Fiber: 1g
- Protein: 5g
- Cholesterol: 37mg
Find it online: https://bakeitwell.com/oreo-trifle
Recipe Tips
- If the whipped cream is too soft, whip it until stiff peaks form before mixing it with other ingredients.
- When cutting the cake, aim for uniform squares around 2 inches to maintain even layers during assembly.
- If the pudding isn’t setting, review your measurements to ensure the correct ratio of pudding mix to milk.
- For a better texture, add pudding before it’s completely set, which helps it absorb into the cake layers.
- When making whipped cream, consider doing it from scratch for a fresher taste compared to store-bought options.
Serving Suggestions
Serve this oreo trifle with fresh berries on the side for a refreshing contrast. Add a scoop of vanilla ice cream for a creamy touch and top with additional crushed Oreos for crunch.
This dessert works well as a centerpiece for summer parties, picnics, and holiday gatherings. You can also use this trifle recipe as inspiration for other layered desserts or customize it with different cookies or fruits.
Finish the dessert with a drizzle of chocolate sauce for added richness. Consider using a light whipped topping to complement the layers without overwhelming them.
Recipe variations
- You can use chocolate cake mix instead of all-purpose flour for a simpler preparation.
- Add 1 teaspoon of almond extract for a unique flavor twist to the pudding layers.
- Either swap crushed Oreos for crushed graham crackers or use mini marshmallows for added texture.
- If scaling, double the recipe ingredients for a large gathering, ensuring you use 8 cups of milk and 4 packages of pudding.
Save This Recipe!
How to Store?
To keep your Oreo trifle fresh, follow these storage tips:
Refrigeration: Cover the trifle tightly with plastic wrap in the fridge for up to 3 days. Whipped cream may lose shape.
Freezing: If freezing, wrap the trifle in plastic wrap and then aluminum foil. Freeze for up to 2 months. Thaw in the fridge overnight before serving.
Portions: For individual servings, place portions into airtight containers. Store in the fridge for up to 3 days or freeze for up to 2 months. Thaw in the fridge before enjoying.
Other Recipes You’ll Love
If you enjoyed this Oreo trifle or any other recipe on my blog, please leave a ⭐ star rating and let me know how it went in the comments below. I appreciate taking time to read about this recipe, thank you!