
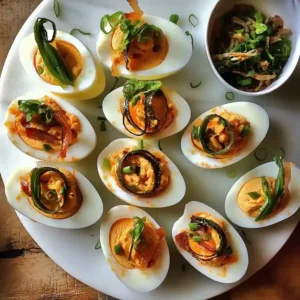
I’m excited to share my kimchi deviled eggs recipe! These little bites pack a punch with that spicy, tangy kick from the kimchi. They’re a fun twist on the classic deviled eggs you might be used to, and trust me, they’ll definitely turn heads at your next get-together.
Solves bland snacks, mayo overload, and slow prep by offering quick, spicy kimchi deviled eggs that deliver protein in bite sized portable servings.

Sometimes, I find myself stuck in a rut when it comes to appetizers. It feels like there are only so many ways to serve chips or cheese. But with these kimchi deviled eggs, I don’t have to worry about boring flavors anymore! Plus, they come together super quick, just 15 minutes from start to finish.
What I love about this recipe is how easy it is to customize. You can mix and match toppings or even switch up the mayo depending on your taste. And don’t worry if you struggle with boiling eggs; I’ve got a reliable timing trick that makes it simple.
If you’re looking for more fun ideas for gatherings, I’ve got you covered. If you want to whip up something sweet as well, try these Bourbon Meatballs! They’re sure to impress just as much as these eggs will.
Why You Will Love This Recipe
- Flavor Twist This recipe adds a spicy, tangy kick to classic deviled eggs, making them far from boring. You’ll get that umami flavor that everyone craves.
- Quick to Make In just 15 minutes, you can whip these up, making them a fantastic last-minute appetizer or snack for any occasion.
- Simple Ingredients You probably have most of the ingredients on hand already. Plus, kimchi is easy to find, so you won’t have to hunt for anything special.
- Storage-Friendly These kimchi deviled eggs can stay in the fridge for two days, so you can prep them ahead of time and enjoy them when you want.
Spicy Kimchi Deviled Eggs Recipe
- Prep Time: 5 minutes
- Cool Time: 0 minutes
- Cook Time: 10 minutes
- Total Time: 15 minutes
- Yield: 4 servings 1x
- Category: appetizer
- Method: boiling
- Cuisine: Korean
- Diet: Dairy-Free, Gluten-Free, Lacto-Ovo Vegetarian, Keto, Paleo, Whole30 Friendly
Description
Delicious and tangy Kimchi Deviled Eggs, perfect for a twist on classic deviled eggs with a hint of spice.
Ingredients
- 6 large eggs, pasture-raised for better flavor
- 2 tablespoons mayonnaise
- 1/4 cup cabbage kimchi, chopped finely
- 2 slices bacon, cut into 3/4-inch wide pieces
- sliced scallions, for garnish
- toasted sesame seeds, for garnish
- fine julienned toasted nori, for garnish
- furikake, for garnish
- Extra chopped kimchi, for garnish
Instructions
- Hard Boil the Eggs: Start by boiling your eggs for about 10 minutes. You will want them to look firm and rich in color. Perfectly cooked eggs yield creamy yolks, while overcooked ones can get crumbly. Avoid the temptation to boil them too long, as that can ruin the texture.
- Cool and Peel: Once the eggs are boiled, cool them quickly in ice water. They should feel cool to the touch after a few minutes. This stops the cooking process and helps prevent the yolks from turning green. Be gentle while peeling; cracks can make filling a bit messier later.
- Prepare the Filling: Take the yolks and mash them together with kimchi and mayonnaise until everything is smooth yet chunky. The mixture should have a delightful aroma from the kimchi, making it really enticing. If it feels too thick, just add tiny splashes of kimchi juice to loosen it up without going overboard.
- Fill the Egg Whites: Carefully spoon or pipe that zesty filling back into the egg whites. You can really pile it up; just make sure it does not overflow. It should look appetizing and colorful, ready to impress. Avoid overfilling to prevent messiness when serving.
- Garnish and Enjoy: Finally, sprinkle some extra chopped kimchi on top for a pop of color and added flavor. The brightness will make each egg look even more tempting. Just keep it light, so it does not overshadow the filling. Now you can serve them up and enjoy the reaction!
Notes
- Storage Tips: Kimchi Deviled Eggs will keep in an airtight container in the refrigerator for two days.
- Expert Tips: Use pasture-raised eggs for better flavor and quality. When chopping kimchi, keep the pieces fine for better mixing in the filling and improved texture in every bite. If eggs crack during boiling, start by bringing the water to a boil before gently adding the eggs. For richer flavor, aim for exactly 10 minutes of boiling for just the right texture. If the filling feels too thick, drizzle in kimchi juice gradually and stir until you get a smoother consistency.
- Reheating Instructions: Not applicable for deviled eggs, as they are best served cold.
- Serving Suggestions: Serve alongside pickled vegetables for a contrasting flavor. Pair with a cold beer or sweet tea for refreshment. Garnish with extra bacon and scallions for added crunch.
- Recipe Variations: Incorporate sriracha for extra heat. Use quail eggs for mini versions. Add chopped herbs like cilantro or parsley for freshness. Substitute lowfat plain yogurt for mayonnaise if you eat dairy. For a vegetarian option, replace bacon with shiitake bacon.
- Ingredient Notes: When selecting kimchi, choose a high-quality cabbage kimchi for the best flavor. You can use avocado or low-fat yogurt for a healthier alternative to mayonnaise.
Nutrition
- Serving Size: 1 egg
- Calories: 350
- Sugar: 1g
- Sodium: 600mg
- Fat: 20g
- Saturated Fat: 7g
- Unsaturated Fat: 10g
- Trans Fat: 0g
- Carbohydrates: 15g
- Fiber: 1g
- Protein: 30g
- Cholesterol: 90mg
Find it online: https://bakeitwell.com/kimchi-deviled-eggs

Recipe Tips
- If eggs crack during boiling, start by bringing the water to a boil before gently adding the eggs.
- When the filling feels too thick, drizzle in kimchi juice gradually and stir until you get a smoother consistency.
- If you’re looking for creamier yolks, aim for exactly 10 minutes of boiling for just the right texture.
- For a richer flavor, consider using pasture-raised eggs; they often taste better than conventional options.
- When chopping kimchi, keep the pieces fine for better mixing in the filling and an improved texture in every bite.
Serving Suggestions
Serve kimchi deviled eggs alongside pickled vegetables for a tangy contrast. Pair them with a cold beer or sweet tea for refreshment.
These deviled eggs work well in salads or as an addition to a charcuterie board. They also make a flavorful topping for lettuce wraps or sandwiches.
Garnish with extra bacon and scallions for added crunch. A drizzle of hot sauce can provide an extra kick if desired.
Recipe variations
- You can use quail eggs instead of large eggs for adorable mini kimchi deviled eggs that pack the same flavor punch.
- Add 1 tablespoon of sriracha to the mayonnaise for an added layer of heat that complements the kimchi nicely.
- Either toss in chopped cilantro or parsley for a fresh finish, or use both for a vibrant herb boost.
- If making for a larger crowd, double the recipe by using 12 large eggs, 4 tablespoons of mayonnaise, and ½ cup of cabbage kimchi.
Save This Recipe!
How to Store?
To keep your kimchi deviled eggs fresh, follow these storage tips:
Refrigeration: Place kimchi deviled eggs in an airtight container. Store them in the refrigerator for up to 2 days.
Freezing: Wrap each deviled egg tightly in plastic wrap, then transfer to a freezer bag. Freeze for up to 3 months. Thaw in the refrigerator overnight.
Serving Temperature: Serve chilled directly from the refrigerator for best flavor and texture. Keep any leftovers in the same airtight container.
Other Recipes You’ll Love
If you enjoyed this Kimchi Deviled Eggs or any other recipe on my blog, please leave a ⭐ star rating and let me know how it went in the comments below. I appreciate taking time to read about this recipe, thank you!