
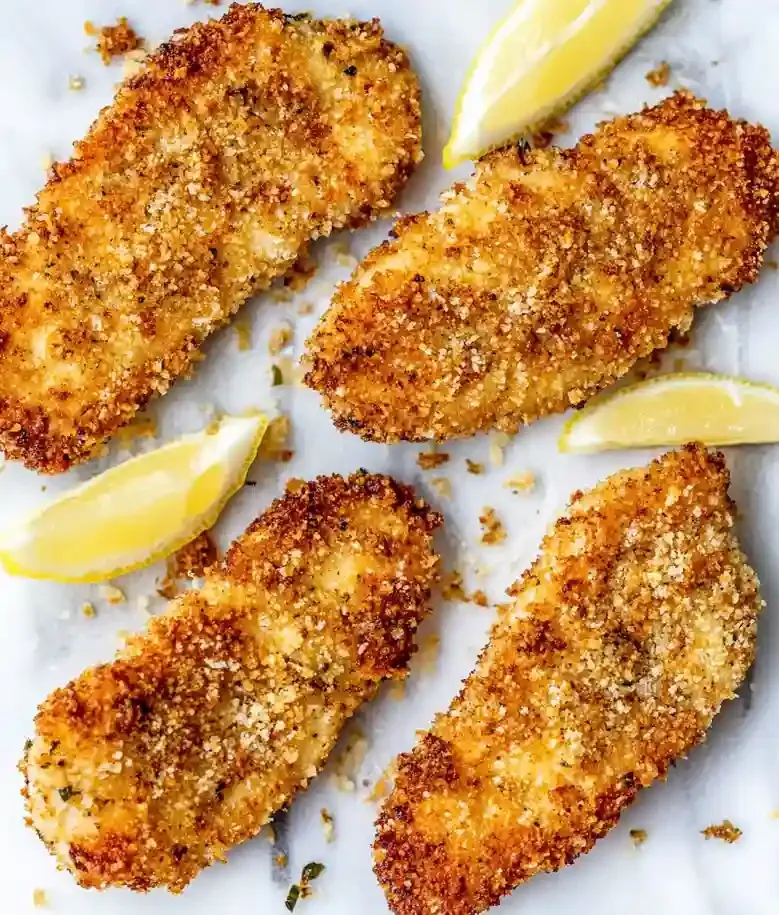
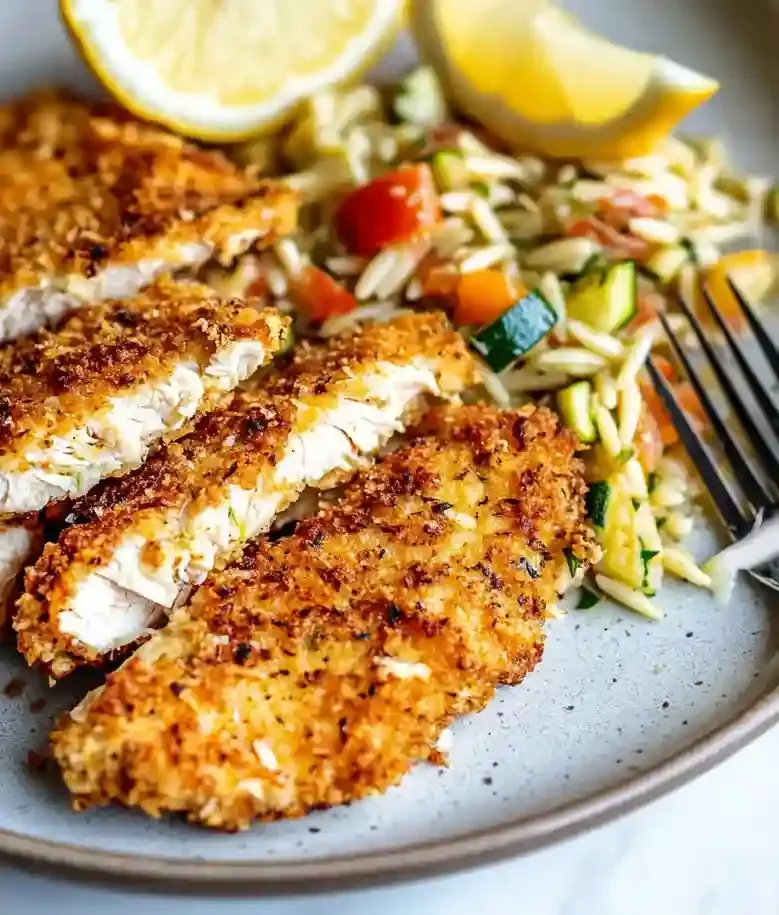
If you’re looking for a quick and tasty meal, these air fryer chicken tenders are just what you need! They’re crispy, juicy, and golden brown, not to mention super easy to whip up.
This recipe fixes dry chicken by delivering juicy meat with a crisp coating without deep frying, reducing mess, and cutting prep and cook time.
I know how challenging it can be to find a healthy recipe that keeps the entire family happy. With everyone in my house having different dietary needs, including gluten allergies, it can feel overwhelming. But trust me, these tenders are a crowd-pleaser that everyone will enjoy.
You can have these chicken tenders ready in under 30 minutes. They require less oil than traditional frying methods, which means less mess in the kitchen. Plus, they’re a great option if you want something gluten-free that doesn’t compromise on flavor or texture.
If you want to pair these tenders with something fun and tasty, give my chicken nuggets air fryer recipe a try!
Why You Will Love This Recipe
- Crispy Texture : These chicken tenders come out super crispy on the outside while staying juicy and tender inside. It’s like getting your fried chicken fix without the deep frying.
- Savory Flavor : Seasoned breadcrumbs and panko add a savory punch that keeps these tenders flavorful and satisfying, making them a hit for all ages.
- Quick to Make : You can whip these up in under 30 minutes, perfect for busy weeknights when you want something simple and delicious.
- Easy Storage : Leftovers last for up to three days in the fridge, so they make for easy meal prep or a tasty snack later on.

Crispy Air Fryer Chicken Tenders
- Prep Time: 5 minutes
- Cool Time: 0 minutes
- Cook Time: 30 minutes
- Total Time: 35 minutes
- Yield: 4 servings 1x
- Category: Main Dish
- Method: Air Frying
- Cuisine: N/A
- Diet: Gluten Free
Description
Crispy and delicious air fryer chicken tenders, perfect for a quick meal or snack. Gluten-free option available!
Ingredients
- 12 chicken tenders (1 1/4 lbs)
- 2 large eggs, beaten
- 11/2 teaspoon kosher salt
- black pepper, to taste
- 1/2 cup seasoned breadcrumbs
- 1/2 cup seasoned panko
- olive oil spray
- lemon wedges, for serving
Instructions
- Preheat & Prep: Start by preheating your air fryer to 400 degrees F. This will ensure crispy chicken tenders that are not soggy. You will know it is ready when it is nice and warm. Do not skip this step, or your tenders might end up rubbery inside.
- Coat the Chicken: Lay out your chicken strips and generously spray them with olive oil. This helps create that golden, crispy layer. Afterward, cover each strip in your favorite gluten-free breadcrumbs. A common mistake is skipping the oil, which could lead to breading falling off during cooking.
- Let Them Rest: Let the coated chicken strips sit for about 10 minutes after breading. This resting time helps the breading stick better during cooking. If you cook them right away, you might find bits of breading left in the air fryer basket.
- Cook in Batches: Place the chicken tenders in a single layer in your air fryer basket, making sure not to crowd them. This ensures that they cook evenly and stay crispy. If you are cooking a lot, just do it in batches so they do not steam each other.
- Check for Doneness: Once the cooking time is up, check that the tenders are cooked through. They should be golden brown and reach an internal temperature of at least 165 degrees F. If they are undercooked, you may want to pop them back in for a few more minutes. It is better to be safe than sorry!
- Let Cool & Serve: After taking them out, let the chicken tenders cool briefly before serving. This cooling time allows the breading to set nicely. Waiting a few minutes helps keep them crispy, so do not rush into munching!
Notes
- Storage Tips: Store leftovers in an airtight container in the refrigerator for up to 3 days.
- Expert Tips: If chicken strips are turning out dry, double-check that you are cooking them for about 15 minutes and reaching an internal temperature of 165 degrees F.
- When the breading does not stick, giving the tenders a rest after coating them for about 10 minutes can help the crumbs adhere better.
- If your tenders are not crispy enough, try not to overload the air fryer basket; cooking in smaller batches usually results in better texture.
- For even cooking, ensuring your air fryer is preheated to 400 degrees F before adding the chicken can make a noticeable difference in crispiness.
- If your tenders tend to stick, a generous spray of olive oil on the strips will help them release easily from the basket while cooking.
- Reheating Instructions: Reheat in the air fryer at 400 degrees F for 3 to 5 minutes until heated through and crispy.
- Serving Suggestions: Serve with lemon wedges for brightness. Pair with air-fried sweet potato fries. Include a side salad for a balanced meal.
- Recipe Variations: Substitute seasoned breadcrumbs with gluten-free crumbs and seasoned panko with gluten-free panko for a gluten-free version. Add garlic powder to the breadcrumb mixture for flavor. Use different spices like paprika or oregano for variety. Try a coconut breadcrumb coating for a tropical twist.
- Ingredient Notes: Choose fresh chicken tenders for the best results as they cook evenly and retain moisture. For gluten-free, make sure all crumbs and coatings are labeled as gluten-free. Quality indicators: Chicken tenders should be pink at the bone and firm, not slimy.
Nutrition
- Serving Size: 1 serving
- Calories: 291
- Sugar: 1.5g
- Sodium: 653mg
- Fat: 7g
- Saturated Fat: 2g
- Unsaturated Fat: 0g
- Trans Fat: 0g
- Carbohydrates: 16.5g
- Fiber: 1g
- Protein: 38.5g
- Cholesterol: 197mg
Recipe Tips
- If chicken strips are turning out dry, double-check that you’re cooking them for about 15 minutes and reaching an internal temperature of 165°F.
- When the breading doesn’t stick, giving the tenders a rest after coating them for about 10 minutes can help the crumbs adhere better.
- If your tenders aren’t crispy enough, try not to overload the air fryer basket; cooking in smaller batches usually results in better texture.
- For even cooking, ensuring your air fryer is preheated to 400°F before adding the chicken can make a noticeable difference in crispiness.
- If your tenders tend to stick, a generous spray of olive oil on the strips will help them release easily from the basket while cooking.
Serving Suggestions
Serve these air fryer chicken tenders with lemon wedges for added brightness. Pair them with air-fried sweet potato fries or include a side salad.
These tenders can also feature in various recipes like chicken tenders wraps, salads, or as a topping for grain bowls. Use them in sliders or sandwiches for a quick meal option.
Add a sauce such as honey mustard or a barbecue sauce for dipping. A drizzle of your favorite hot sauce can also enhance their flavor.
Recipe variations
- You can use turkey tenders or tofu as a substitute for the chicken tenders, offering a different protein option for your meal.
- Add 1 teaspoon of garlic powder, 1 teaspoon of paprika, or 1 teaspoon of oregano to the breadcrumb mixture for a boost of flavor.
- Either choose coconut breadcrumbs for a unique coating or go with traditional breadcrumbs for a classic taste to suit your preference.
- If cooking for a larger group, scale up by doubling the amounts to 24 chicken tenders, ensuring you have enough for everyone to enjoy.
Save This Recipe!
How to Store?
To keep your air fryer chicken tenders fresh, follow these storage tips:
Refrigeration: Place leftover chicken tenders in an airtight container. Store in the refrigerator for up to 3 days.
Freezing: Wrap tenders individually in aluminum foil and place in a freezer bag. Freeze for up to 3 months. Thaw in refrigerator overnight or reheat directly from frozen.
Reheating: Reheat chicken tenders in the air fryer at 350°F for about 5-7 minutes for crispiness.
Other Recipes You’ll Love
- Air Fryer Jalapeno Poppers
- Air Fryer Zucchini Fries
- Air Fryer Blooming Onion
- Air Fryer Tortilla Chips
If you enjoyed this air fryer chicken tenders or any other recipe on my blog, please leave a ⭐ star rating and let me know how it went in the comments below. I appreciate taking time to read about this recipe, thank you!